VueMastery


Appearance
tqdm是一个快速,可扩展的Python进度条库,它可以轻松的在终端和notebook中显示进度条。
$ pip install tqdmfrom tqdm import tqdm, trange
import time
for i in tqdm(range(100)):
time.sleep(.01)| 参数 | 功能 |
|---|---|
| iterable | 可迭代对象 |
| total | 刻度总大小 |
| desc | 进度条标题 |
| unit | 进度条单位 |
| colour | 进度条的颜色 |
| delay | 进度条出现的延迟时间 |
colorama是一个跨平台的ANSI颜色库,可以轻松的控制在Windows和Linux/MacOS终端显示不同颜色的文本。
from colorama import init, Fore, Back, Style

# 设置每次输出后自动重置样式设置
init(autoreset=True)
# 输出红色加粗的Hello world!
print(Fore.CYAN + Style.BRIGHT + 'Hello world!')
- 压缩图像
- 文件格式转换
- 打印图像
- 调用外部显示程序
- 与
Tk的PhotoImage和BitmapImage一起使用
- 色彩空间转换
- 调整亮度、对比度、饱和度
- 旋转、翻转、裁剪
PIL库主要可以实现图像归档和图像处理两方面动能需求:
- (1)图像归档:对图像进行批处理、生成图像预览、图像格式转换等。
- (2)图像处理:图像基本处理、像素处理、颜色处理等。
$ pip install pillowfrom PIL import Image
# 如果图片不存在,则抛出异常
im = Image.open("img_154.JPG")
# 图片格式、大小、模式:如果图像不是从文件中读取的,则format为None,size为(宽, 高)
# mode常见的模式是“L”(亮度)表示灰度图像,“RGB”表示真彩色图像,“CMYK”表示印前图像
# 一旦有了该类的实例Image,就可以使用该类定义的方法来处理和操作图像
print(im.format, im.size, im.mode)
# 显示图片
im.show()Image是PIL最重要的类,它代表一张图片,引入这个类的方法如下:
from PIL import Image| 方法 | 描述 |
|---|---|
| Image.verify() | 对图像文件完整性进行检查、返回异常 |
| Image.open(filename) | 根据文件名加载图像文件 |
| Image.new(mode,size,color) | 根据给定参数创建一个新的图像 |
| Image.frombytes(mode,size,data) | 根据像素点data创建图像 |
| Image.open(StringIO.StringIO(buffer)) | 从字符串中获取图像 |
- 通过 Image 打开图像文件时,图像的栅格数据不会被直接解码或者加载,程序只是读取了图像文件头部的元数据信息,这部分信息标识了图像的格式、颜色、大小等。因此,打开一个文件会十分迅速,与图像的存储和压缩方式无关。
- 要加载一个图像文件,最简单的形式如下,之后所有操作对 im 起作用。
from PIL import Image
im = Image.open ("a.jpg")4个处理图片的常用属性 | 属性 | 描述 |
|---|---|
| Image.format | 标识图像格式或来源,如果图像不是从文件读取,值为None |
| Image.mode | 图像的色彩模式,"L"为灰度图像,"RGB"为真彩色图像,"CMYK"为出版印刷图像 |
| Image.size | 图像宽高,单位是像素(pixel),返回二元组形式 |
| Image.palette | 调色板属性,返回一个ImagePalette类型 |
from PIL import Image

im = Image.open('img_154.JPG')
print(im.width, im.height, im.format, im.mode, im.size, im.palette)from PIL import Image
image = Image.new('RGB', (600, 600), (255, 255, 255))
image.show()| 方法 | 描述 |
|---|---|
| Image.save(filename, format) | 将图像保存为filename文件名,format是图片格式 |
| Image.convert(mode) | 使用不同的参数,转换图像为新的模式 |
| Image.thumbnail(size) | 创建图像缩略图,size是缩略图尺寸宽高组成的元组 |
from PIL import Image

im = Image.open('img_154.JPG')
# 将原来的真彩图像转换为灰度图像,会返回一个转换后图像,对原图形不会造成影响
converted_img = im.convert(mode='L')
# 调用Image实例对象的show方法,显示图像
converted_img.show()
# 保存图像
converted_img.save('converted_img.jpg')其中,save()方法有两个参数:文件名 filename 和图像格式 format。如果调用时不指定保存格式,PIL将自动根据文件名filename后缀存储图像;如果指定格式,则按照格式存储。
搭配采用 open() 和 save() 方法可以实现图像的格式转换,例如,将 jpg 格式转换为 png 格式代码如下。需要注意,Image 类的 save() 方法主要用于保存文件到硬盘,PIL 库还提供了功能更强大的格式转换方法。
from PIL import Image
im = Image.open("a.jpg")
im.save("a.png")Image缩放和旋转 Image类可以缩放和旋转图像,其中,rotate(方法以逆时旋转的角度值作为参数来旋转图像。 Image类的图像旋转和缩放方法(共2个):
| 方法 | 描述 |
|---|---|
| Image.resize(size) | 按size大小调整图像,生成副本 |
| Image.rotate(angle) | 按angle角度旋转图像,生成副本, |
from PIL import Image

im = Image.open('img_154.JPG')

resized_img = im.resize((200, 200))
resized_img.show()
# 正数是逆时针旋转,负数是顺时针旋转
rotated_img = im.rotate(60)
rotated_img.show()
Image类能够对每个像素点或者一幅RGB图像的每个通道单独进行操作。split()方法能够将RGB 图像各颜色通道提取出来;
merge()方法能够将各独立通道再合成一幅新的图像。
| 方法 | 描述 |
|---|---|
| Image.point(func) | 根据函数func的功能对每个像素进行运算,返回图像副本 |
| Image.split() | 提取RGB图像的每个颜色通道,返回图像副本 |
| Image.merge(mode.bands) | 合并通道,其中mode表示色彩,bands表示新的色彩通道 |
| Image.blend(im1, im2, alpha) | 将两幅图片im1和im2按照如下公式插值后生成新的图像: im1 (1.0-alpha)+im2 alpha |
from PIL import Image

im = Image.open('img_154.JPG')
r, g, b = im.split()

om = Image.merge('RGB', (b, g, r))
om.save("aRGB.jpg")from PIL import Image
im = Image.open('img_154.JPG')
# 对每个像素点进行操作,放大倍数值越大,曝光度越大
result = im.point(lambda point: point * 5.0)
result.show()from PIL import Image
im = Image.open('img_154.JPG')
r, g, b = im.split()
lst = [(r, g, b), (r, b, g), (g, b, r), (g, r, b), (b, g, r), (b, r, g)]
for rgb in lst:
img = Image.merge('RGB', rgb)
img.show()from PIL import Image
from urllib.request import urlopen
url = 'https://dingyue.ws.126.net/2019/1218/b10ec1f1g00q2pa2s022nc200dw007tg00dw007t.gif'
result = Image.open(urlopen(url))
result.show()$ pip install richfrom rich import print, inspect
# 可以查看对象的详细属性和方法,并且以特殊颜色显示
arr = [1, 2, 3, 4, 5]
print(arr)
inspect(arr)安装python时有内置的虚拟环境管理器,但是没这么好用,所以推荐使用第三方的虚拟环境管理器。
virtualenv是虚拟环境管理器,只负责管理(创建、删除等)虚拟环境。virtualenvwrapper是virtualenv的扩展,负责管理虚拟环境,包括创建、删除、切换等。
$ pip install virtualenv    # 安装
$ virtualenv --version      # 检查是否安装
# linux版,安装基于virtualenv的扩展工具
$ pip install virtualenvwrapper         # linux版本
$ virtualenvwrapper --version           # 检查是否安装
# windows版,安装基于virtualenv的扩展工具
$ pip install virtualenvwrapper-win             # window安装这个
# $ virtualenvwrapper-win --version   # 检查是否安装,windows上如果不是这个查看版本,那就是下面这个
$ virtualenvwrapper --version # 查看版本来检查是否安装$ export WORKON_HOME=~/Envs # 暴露为环境变量
$ mkdir -p $WORKON_HOME
$ source /usr/local/bin/virtualenvwrapper.sh # 重载载配置环境,将上面设置的 WORKON_HOME 设置为虚拟环境存放与管理的根路径
$ mkvirtualenv env1 # 创建虚拟环境 env1高级系统设置 > 环境变量 > 系统变量 > 新建 > WORKON_HOMEWORKON_HOME变量的值是自己想放置的虚拟环境存放与管理的根路径,可以自己定义存放在哪里,比如我想存放在F:\venvs$ mkvirtualenv env1$ workon env1$ deactivate$ rmvirtualenv env1$ lsvirtualenv$ workon env1$ workon$ mkvirtualenv myenv1 --system-site-packages根据系统已经有的python解释器,可以指定虚拟环境使用的解释器
$ mkvirtualenv --python=python3安装路径 myenv1$ virtualenvwrapper -h1.查看当前环境的依赖包: pip list
2.导出安装环境:pip freeze > requirements.txt
3.安装相关依赖:pip install -r requirements.txt
4.用国内源安装: pip install -i https://pypi.doubanio.com/simple/ -r requirements.txt
5.设置永久国内源
pip install pip -U #建议先升级pip到最新的版后再进行配置:
pip config set global.index-url https://mirrors.aliyun.com/pypi/simple/
# Writing to C:\Users\Administrator\AppData\Roaming\pip\pip.ini
6.注:国内源
清华大学 https://pypi.tuna.tsinghua.edu.cn/simple/
阿里云 http://mirrors.aliyun.com/pypi/simple/
中国科技大学 https://pypi.mirrors.ustc.edu.cn/simple
豆瓣 http://pypi.mirrors.ustc.edu.cn/simple
5.换回默认源
pip config unset global.index-url参考资料:
- Official bibliography: @Reference for VirtualenvWrapper
- Tutorials for virtualenvwrapper: @Reference for VirtualenvWrapper
conda创建虚拟环境 官网: Reference
创建指定版本的python解释器的虚拟环境,并且指定从哪里下载包
conda create -y --name paddledetection_env python=3.8 --channel https://mirrors.tuna.tsinghua.edu.cn/anaconda/pkgs/free/conda activate myenvconda deactivateconda env list删除该虚拟环境(包括该虚拟环境中下载的所有包和工具)
conda remove -y --name myenv --all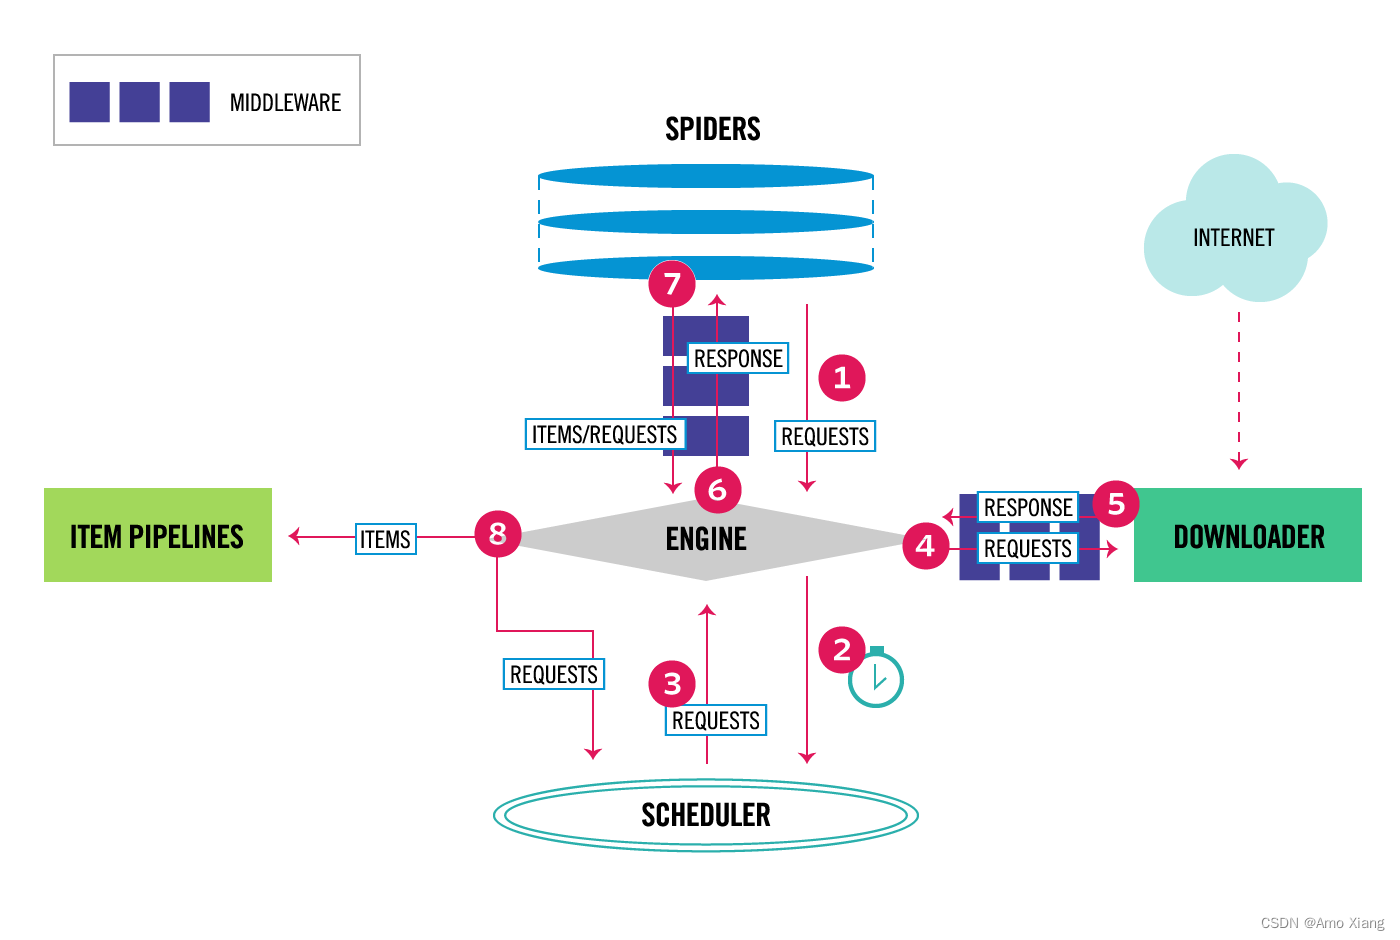
推荐: Scrapy 入门参考博客
$ pip install scrapy # -i http://pypi.douban.com/simple --trusted-host pypi.douban.com$ scrapy startproject <项目名称> [项目所在目录] # 不写项目所在目录, 则默认在以该项目名称作为项目所在目录名称
# 例如
$ scrapy startproject BaiduSpider BaiduSpiderDir$ cd <项目所在目录>
$ scrapy genspider <爬虫名> <爬取的网址>
# 例如: 生成一个爬取百度首页内容的模块, 指定模块名称和网址
$ scrapy genspider baidu www.baidu.com在
settings.py文件中设置
# 通过 User-Agent 伪装成浏览器
USER_AGENT = 'Mozilla/5.0 (Windows NT 10.0; Win64; x64) AppleWebKit/537.36 (KHTML, like Gecko) Chrome/124.0.0.0 Safari/537.36'

# 遵循互联网爬虫协议: False 不遵守, True 遵守
ROBOTSTXT_OBEY = False

# 日志输出等级
LOG_LEVEL = 'WARNING' # CRITICAL, ERROR, WARNING, INFO, DEBUG# spider 包下创建出来的 爬虫文件中的 name 为爬虫名
$ scrapy crawl 爬虫名